Friday, July 24, 2009

How MassTransit Publish and Subscribe works

clip_image002

This is a follow-on from my last post, A First Look at MassTransit. Here’s my take on how publish and subscribe works. It’s based on a very brief scan of the MT code, so there could well be misunderstandings and missing details.

The core component of MassTransit is the ServiceBus, it’s the primary API that services use to subscribe to and publish messages. The ServiceBus has an inbound and outbound pipeline. When publish is called, a message gets sent down the pipeline until a component that cares that message type dispatches it to an endpoint. Similarly, when a message is received it is passed down the input pipeline giving each component a chance to process it.

Understanding how the input and output pipelines are populated is the key to understanding how MassTransit works. It’s instructive to get a printout of your pipelines by inspecting them with the PipelineViewer. I’ve created a little class to help with this:


using System.IO;
using MassTransit.Pipeline;
using MassTransit.Pipeline.Inspectors;

namespace MassTransit.Play.Helpers
{
    public class PipelineWriter : IPipelineWriter
    {
        private readonly TextWriter writer;
        private readonly IServiceBus bus;

        public PipelineWriter(IServiceBus bus, TextWriter writer)
        {
            this.bus = bus;
            this.writer = writer;
        }

        public void Write()
        {
            writer.WriteLine("InboundPipeline:\r\n");
            WritePipeline(bus.InboundPipeline);
            writer.WriteLine("OutboundPipeline:\r\n");
            WritePipeline(bus.OutboundPipeline);
        }

        private void WritePipeline(IPipelineSink<object> pipeline)
        {
            var inspector = new PipelineViewer();
            pipeline.Inspect(inspector);
            writer.WriteLine(inspector.Text);
        }
    }
}

Let’s look at the sequence of events when RuntimeServices.exe, a subscriber service and a publishing service start up.

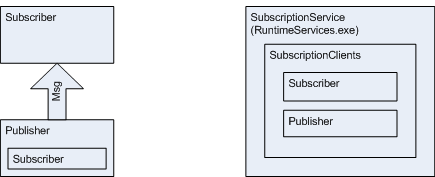
When RuntimeServices starts up the SubscriptionService creates a list of ‘SubscriptionClients’. Initially this is empty.

clip_image003

When our subscriber comes on line, it sends an AddSubscriptionClient message to the subscription service. The subscription service then adds our subscriber to its list of subscription clients.

clip_image004

Next our publisher comes on line. It also sends an AddSubscriptionClient message to the subscription service. It too gets added to the subscription clients list.

clip_image005

When the subscriber subscribes to a particular message type, ServiceBus sends an AddSubscription message to SubscriptionService which in turn scans its list of subscription clients and sends the AddSubscription message to each one.

SubscriptionService also adds the subscription to its list of subscriptions so that when any other services come on line it can update them with the list.

The publisher receives the AddSubscription message that was broadcast to all the subscription clients and adds the subscriber endpoint to its outbound pipeline. Note that the Subscriber also receives it’s own AddSubscription message back and adds itself to its outbound pipeline (not shown in the diagram).

clip_image006

The subscriber also adds a component to its inbound pipeline to listen for messages of the subscribed type. I haven’t show this in the diagram either.

When the publisher publishes a message, it sends the message down its outbound pipeline until it is intercepted by the subscriber’s endpoint and dispatched to the subscriber’s queue. The subscription service is not involved at this point.

clip_image007

I hope this is useful if you’re trying to get to grips with MassTransit. Thanks to Dru for clarifying some points for me.

Wednesday, July 22, 2009

A First Look at MassTransit

Get the code for this post here:

http://static.mikehadlow.com/MassTransit.Play.zip

I’ve recently been trying out MassTransit as a possible replacement for our current JBOWS architecture. MassTransit is a “lean service bus implementation for building loosely coupled applications using the .NET framework.” It’s a simple service bus based around the idea of asynchronous publish and subscribe. It’s written by Dru Sellers and Chris Patterson, both good guys who have been very quick to respond on both twitter and the MassTransit google group.

To start with I wanted to try out the simplest thing possible, a single publisher and a single subscriber. I wanted to be able to publish a message and have the subscriber pick it up.

The first thing to do is get the latest source from the MassTransit google code repository and build it.

The core Mass Transit infrastructure is provided by a service called MassTransit.RuntimeServices.exe this is a windows service built on Top Shelf (be careful what you click on at work when Googling for this J). I plan to blog about Top Shelf in the future, but in short it’s a very nice fluent API for building windows services. One of the nicest things about it is that you can run the service as a console app during development but easily install it as a windows service in production.

Before running RuntimeServices you have to provide it with a SQL database. I wanted to use my local SQL Server instance so I opened up the MassTransit.RuntimeServices.exe.config file, commented out the SQL CE NHibernate configuration and uncommented the SQL Server stuff. I also changed the connection string to point to a test database I’d created. I then ran the SetupSQLServer.sql script (under the PreBuiltServices\MassTransit.RuntimeServices folder) into my database to create the required tables.

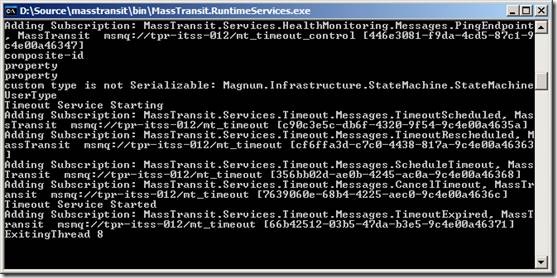
So let’s start up RuntimeServices by double clicking the MassTransit.RuntimeServices.exe in the bin directory.
clip_image002

A whole load of debug messages are spat out. Also we can see that some new private MSMQs have been automatically created:
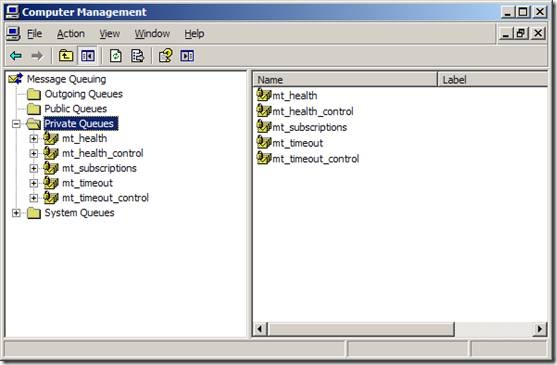
clip_image004

We can also launch MassTransit.SystemView.exe (also in the bin folder) which gives us a nice GUI view of our services:

clip_image006

I think it shows a list of subscriber queues on the left. If you expand the nodes you can see the types that are subscribed to. I guess the reason that the mt_subscriptions and mt_health_control queues are not shown is that they don’t have any subscriptions associated with them.

Now let’s create the simplest possible subscriber and publisher. First I’ll create a message structure. I want my message class to be shared by my publisher and subscriber, so I’ll create it in its own assembly and then reference that assembly in the publisher and subscriber projects. My message is very simple, just a regular POCO:

namespace MassTransit.Play.Messages
{
    public class NewCustomerMessage
    {
        public string Name { get; set; }
    }
}

Now for the publisher. MassTransit uses the Castle Windsor IoC container by default and log4net so we need to add the following references:
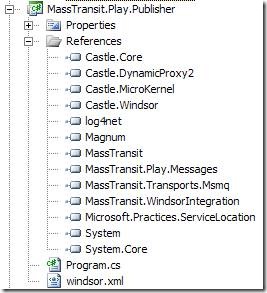
clip_image008

The MassTransit API is configured as a Windsor facility. I’m a big fan of Windsor, so this all makes sense to me. Here’s the Windsor config file:

<?xml version="1.0" encoding="utf-8" ?>
<configuration>
  <facilities>
    <facility id="masstransit">
      <bus id="main" endpoint="msmq://localhost/mt_mike_publisher">
        <subscriptionService endpoint="msmq://localhost/mt_subscriptions" />
        <managementService heartbeatInterval="3" />
      </bus>
      <transports>
        <transport>MassTransit.Transports.Msmq.MsmqEndpoint, MassTransit.Transports.Msmq</transport>
      </transports>
    </facility>
  </facilities>
</configuration>

As you can see we reference the ‘masstransit’ facility and configure it with two main nodes, bus and transports. Transports is pretty straightforward, we simply specify the MsmqEndpoint. The bus node specifies an id and an endpoint. As far as I understand it, if your service only publishes, then the queue is never used. But MassTransit throws, if you don’t specify it. I’m probably missing something here, any clarification will be warmly received J

Continuing with the configuration; under bus are two child nodes, subscriptionService and management service. The subscriptionService endpoint specifies the location of the subscription queue which RuntimeServices uses to keep track of subscriptions, this should be the location of the queue created when RuntimeServices starts up for the first time, on my machine it was mt_subscriptions. I’m unsure what the managementService specifies exactly, but I think it’s the subsystem that allows RuntimeServices to monitor the health of the service. I’m assuming that the heartbeatInterval is the number of seconds between each notification.

Next, let’s code our publisher. I’m going to create a simple console application, I would host a service with Top Shelf in production, but right now I want to do the simplest thing possible, so I’m going to keep any other infrastructure out of the equation for the time being. Here’s the publisher code:

using System;
using MassTransit.Play.Messages;
using MassTransit.Transports.Msmq;
using MassTransit.WindsorIntegration;

namespace MassTransit.Play.Publisher
{
    public class Program
    {
        static void Main()
        {
            Console.WriteLine("Starting Publisher");

            MsmqEndpointConfigurator.Defaults(config =>
            {
                config.CreateMissingQueues = true;
            });

            var container = new DefaultMassTransitContainer("windsor.xml");
            var bus = container.Resolve<IServiceBus>();

            string name;
            while((name = GetName()) != "q")
            {
                var message = new NewCustomerMessage {Name = name};
                bus.Publish(message);
                
                Console.WriteLine("Published NewCustomerMessage with name {0}", message.Name);
            }

            Console.WriteLine("Stopping Publisher");
            container.Release(bus);
            container.Dispose();
        }

        private static string GetName()
        {
            Console.WriteLine("Enter a name to publish (q to quit)");
            return Console.ReadLine();
        }
    }
}

The first statement instructs the MassTransit MsmqEndpointConfigurator to create any missing queues so that we don’t have to manually create the mt_mike_publisher queue. The pattern used here is very common in the MassTransit code, where a static method takes an Action<TConfig> of some configuration class.

The next line creates the DefaultMassTransitContainer. This is a WindsorContainer with the MassTransitFacility registered and all the components needed for MassTransit to run. For us the most important service is the IServiceBus which encapsulates most of the client API. The next line gets the bus from the container.

We then set up a loop getting input from the user, creating a NewCustomerMessage and calling bus.Publish(message). It really is as simple as that.

Let’s look at the subscriber next. The references and Windsor.xml config are almost identical to the publisher, the only thing that’s different is that the bus endpoint should point to a different msmq; mt_mike_subscriber in my case.

In order to subscribe to a message type we first have to create a consumer. The consumer ‘consumes’ the message when it arrives at the bus.

using System;
using MassTransit.Internal;
using MassTransit.Play.Messages;

namespace MassTransit.Play.Subscriber.Consumers
{
    public class NewCustomerMessageConsumer : Consumes<NewCustomerMessage>.All, IBusService
    {
        private IServiceBus bus;
        private UnsubscribeAction unsubscribeAction;

        public void Consume(NewCustomerMessage message)
        {
            Console.WriteLine(string.Format("Received a NewCustomerMessage with Name : '{0}'", message.Name));
        }

        public void Dispose()
        {
            bus.Dispose();
        }

        public void Start(IServiceBus bus)
        {
            this.bus = bus;
            unsubscribeAction = bus.Subscribe(this);
        }

        public void Stop()
        {
            unsubscribeAction();
        }
    }
}

You create a consumer by implementing the Consumes<TMessage>.All interface and, as Ayende says, it’s a very clever, fluent way of specifying both what needs to be consumed and how it should be consumed. The ‘All’ interface has a single method that needs to be implemented, Consume, and we simply write to the console that the message has arrived. Our consumer also implements IBusService, that gives us places to start and stop the service bus and do the actual subscription.

Here’s the Main method of the subscription console application:

using System;
using Castle.MicroKernel.Registration;
using MassTransit.Play.Subscriber.Consumers;
using MassTransit.Transports.Msmq;
using MassTransit.WindsorIntegration;

namespace MassTransit.Play.Subscriber
{
    class Program
    {
        static void Main()
        {
            Console.WriteLine("Starting Subscriber, hit return to quit");

            MsmqEndpointConfigurator.Defaults(config =>
                {
                    config.CreateMissingQueues = true;
                });

            var container = new DefaultMassTransitContainer("windsor.xml")
                .Register(
                    Component.For<NewCustomerMessageConsumer>().LifeStyle.Transient
                );

            var bus = container.Resolve<IServiceBus>();
            var consumer = container.Resolve<NewCustomerMessageConsumer>();
            consumer.Start(bus);

            Console.ReadLine();
            Console.WriteLine("Stopping Subscriber");
            consumer.Stop();
            container.Dispose();
        }
    }
}

Once again we specify that we want MassTransit to create our queues automatically and create a DefaultMassTransitContainer. The only addition we have to make for our subscriber is to register our consumer so that the bus can resolve it from the container.

Next we simply grab the bus and our consumer from the container and call start on the consumer passing it the bus. A nice little bit of double dispatch :)

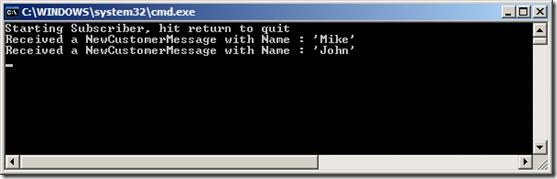
Now we can start up our Publisher and Subscriber and send messages between them.

clip_image010

clip_image012

Wow it works! I got a lot of childish pleasure from starting up multiple instances of my publisher and subscriber on multiple machines and watching the messages go back and forth. But then I’m a simple soul.

Looking at the MSMQ snap-in, we can see that the MSMQ queues have been automatically created for mt_mike_publisher and mt_mike_subscriber.
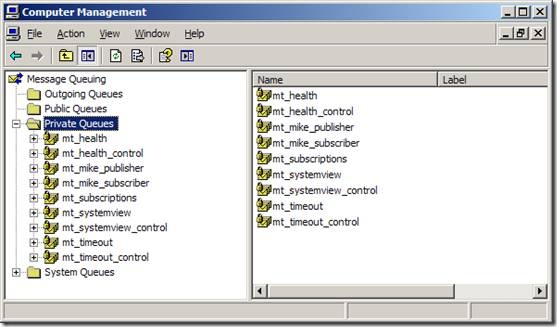
clip_image014

MassTransit System View also shows that the NewCustomerMessage is subscribed to on mt_mike_subscriber. It also shows the current status of our services. You can see that I have been turning them on and off through the morning.

clip_image016

Overall I’m impressed with MassTransit. Like most new open source projects the documentation is non-existent, but I was able to get started by looking at the Starbucks sample and reading Rhys C’s excellent blog posts. Kudos to Chris Patterson (AKA PhatBoyG) and Dru Sellers for putting such a cool project together.

Tuesday, June 30, 2009

IronPython in Action

image Writing a book about IronPython presents a dilemma, do you write a book introducing Python to .NET developers, or do you write a book introducing .NET to Python developers? Striking the right balance between the two is always going to be difficult, but Michael Foord and Christian Muirhead have made a very compelling attempt. Of course I can’t speak for the Python hacker coming to the world of .NET for the first time, but for a .NET guy like me, the book is an excellent introduction to Python and how IronPython works with the rest of the .NET ecosystem.

It’s a very well written and crafted book, with an easy to read conversational style. I find many programming books quite hard work, but this one was a pleasure.

The compromise for me was a rather too high level introduction to Python itself, I would have preferred a deeper introduction to the details of Python and its standard libraries. But then I guess I could always go and buy a Python book, or check out the prodigious online resources for a more in-depth view. I’m not particularly interested in Winforms programming, so I didn’t really get much out of those parts of the book, but I guess the detail is understandable when you know that the authors day job is programming a large winforms system, Resolver One. Chapter 8 on metaprogramming and protocols was very interesting for a dynamic newbe like me, and chapter 15, on embedding the IronPython engine, also sparked off quite a few ideas.

I disagree with Craig Murphy’s comment on the back cover, “… and if you are new to programming, it’s for you too.” Michael and Christian go too deep too fast for a complete beginner. You would really need to have some background in either .NET or Python to get the most out of this book.

So am I excited about IronPython? A bit. I think I need to actually try some serious programming with it. For me its two obvious applications are as an embedded scripting language and for those tasks that don’t justify a fully compiled .NET application, such as automated deployments. I’m sure that you could be very successful building large applications with it, as indeed the authors have, but I don’t feel immediately compelled to drop C#.

I’m certainly not as excited about IronPython and the DLR as I am about functional languages such as F#. Functional programming really is a new paradigm. If you told me we would all be writing our applications with dynamic languages in ten years time, I’d be sceptical. But with functional languages, I’d be inclined to agree. Maybe we will see the emergence of a more polyglot programming ecosystem? In that world there’s certainly a place for IronPython.

Thursday, June 11, 2009

TFS Build: _PublishedWebsites for exe and dll projects

We’re using TFS on my current project. Yes, yes, I know.

It’s generally good practice to collect all the code under your team’s control in a single uber-solution as described in this Patterns and Practices PDF, Team Development with TFS Guide. If you then configure the TFS build server to build this solution, it’s default behaviour is to place the build output into a single folder, ‘Release’.

Any web application projects in your solution will also be output to a folder called _PublishedWebsites\<name of project>. This is very nice because it means that you can simply robocopy deploy the web application.

Unfortunately there’s no similar default behaviour for other project types such as WinForms, console or library. It would be very nice if we could have a _PublishedApplications\<name of project> sub folder with the output of any selected project(s). Fortunately it’s not that hard to do.

The way _PublishedWebsites works is pretty simple. If you look at the project file of your web application you’ll notice an import near the bottom:

<Import Project="$(MSBuildExtensionsPath)\Microsoft\VisualStudio\v9.0\WebApplications\Microsoft.WebApplication.targets" />

On my machine the MSBuildExtensionsPath property evaluates to C:\Program Files\MSBuild, if we open the Microsoft.WebApplication.targets file we can see that it’s a pretty simple MSBuild file that recognises when the build is not a desktop build, i.e. it’s a TFS build, and copies the output to:

$(OutDir)_PublishedWebsites\$(MSBuildProjectName)

I simply copied the Micrsoft.WebApplication.targets file, put it under source control with a relative path from my project files and changed _PublishedWebsites to _PublishedApplications and renamed the file CI.exe.targets. For each project that I want to output to _PublishedApplications, I simply added this import at the bottom of the project file:

<Import Project="<your relative path>\CI.exe.targets" />

You can edit CI.exe.targets (or whatever you want to call it) to do your bidding. In my case, the only change so far is to add a couple of lines to copy the App.config file:

<Copy SourceFiles="$(OutDir)$(TargetFileName).config" DestinationFolder="$(WebProjectOutputDir)\bin" SkipUnchangedFiles="true" />

There’s a lot of stuff in Microsoft.WebApplication.targets that’s only relevant to web applications and can be stripped out for other project types, but I’ll leave that as an exercise for the reader.

There was also a discussion on StackOverflow, with some nice alternative suggestions of how you might want to do this. It’s worth checking out.

Friday, May 29, 2009

What I look for in a Code Review

I recently put this bullet point list together for the team I’m currently working with.

Naming Conventions

General Principles

  • The core imperative is to organise complexity.
  • Clarity and readability is central. “Intention Revealing”
  • Do not prematurely optimise for performance.
  • Do not repeat yourself. Never copy-and-paste code.
  • Decouple.
  • Always try to leave the code you work on in a better state than before you started (the ‘boy scout’ principle)

Keep the source clean

  • Always delete unused code. Including variables and using statements
  • Don’t comment out code, delete it. We have source control to manage change.

Naming things

  • The name should accurately describe what the thing does.
  • Do not use shortenings, only use well understood abbreviations.
  • If the name looks awkward, the code is probably awkward.

Namespaces

  • Namespaces should match the project name + path inside the project. This is what VS will give you by default.
  • Classes that together provide similar functions should be grouped in a single namespace.
  • Avoid namespace dependency cycles.

Variables

  • Use constants where possible. Avoid magic strings.
  • Use readonly where possible
  • Avoid many temporary variables.
  • Never use a single variable for two different puposes.
  • Keep scope as narrow as possible. (declaration close to use)

Methods

  • The name should accurately describe what the method does.
  • It should only do one thing.
  • It should be small (more than 10 lines of code is questionable).
  • The number of parameters should be small.
  • Public methods should validate all parameters.
  • Assert expectations and throw an appropriate error if invalid.
  • Avoid deep nesting of loops and conditionals. (Cyclomatic complexity).

Classes

  • The name should accurately describe what the class does.
  • Classes typically represent data or services, be clear which your class is.
  • Design your object oriented schema deliberately.
  • A class should be small.
  • A class should have one responsibility only.
  • A class should have a clear contract.
  • A class should be decoupled from its dependencies.
  • Favour composition over inheritance.
  • Avoid static classes and methods.
  • Make the class immutable if possible.

Interfaces

  • Rely on interfaces rather than concrete classes wherever possible.
  • An interface is a contract for interaction.
  • An interface should have a single purpose (ISP)

Tests

  • All code should have unit tests if possible.
  • Test code should have the same quality as production code.
  • Write code test-first wherever possible.

Error Handling

  • Only wrap code with a try..catch statement if you are expecting it to throw a specific exception.
  • Unexpected errors should only be handled at process boundaries.
  • Never ‘bury’ exceptions.

Mike Ormond interviews me about the MVC Framework

This week Mike Ormond made the trip down to Brighton to join me for lunch and talk about ASP.NET MVC. He’s put together a couple of videos based on our chat. The backdrop is Brighton’s most famous landmark, The Pavillion.


Saturday, May 09, 2009

Multi-tenanted services with the Windsor WCF Facility

This is the sixth in a series of posts featuring the WCF Facility:

Windsor WCF Integration
WCF / Windsor Integration: Using the perWebRequest lifestyle
WCF / Windsor Integration: Adding Behaviours
Atom feeds with the Windsor WCF Facility
Windsor WCF Facility: MessageAction and MessageEnvelopeAction

Download the code for this post here:
http://static.mikehadlow.com/Suteki.Blog.zip

A while back I started writing a series of posts on Multi-tenancy. This is the idea that a single instance of your application can host multiple clients with varying requirements. An IoC container such as Windsor is an excellent enabling technology for doing this. It allows you to compose varying object graphs at runtime depending on some context.

For example, I recently had a client with an integration requirement to a legacy system that they had developed in house. The legacy system was deployed with one instance in London and another in New York. The US and UK requirements differed slightly and so two versions of the application had been developed. I wanted a single service that could handle the needs for both legacy systems. Since they were 90% similar it made sense to simply swap in different components for where they differed.

In this post I want to show how to host a single instance of a service that can compose different components depending on the host name.

Say we have two domain names: red.shop and blue.shop. We can configure IIS with the two host headers (bindings):

iis_multitenanted

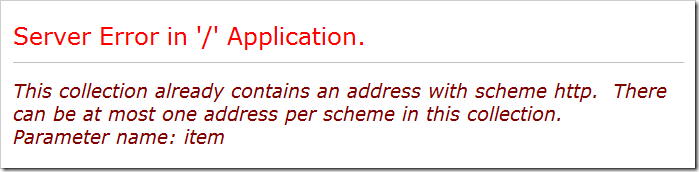
The first thing to notice when you do this with a standard WCF setup, is that you get an error:

multi_hostheader_error

“This collection already contains an address with scheme http.  There can be at most one address per scheme in this collection.” That’s right, WCF doesn’t play nicely with multiple host headers/bindings. This is a major complaint and Microsoft have gone some way to resolving it by providing a mechanism where you can specify a single address that service will listen for. Unfortunately that doesn’t help us. We want to listen for any request arriving at the service and then use its hostname to compose our components.

There is a workaround. The addresses for an endpoint are passed from IIS to WCF via the ServiceHostFactory. If you intercept this and pass an empty list of addresses, WCF falls back to using configured endpoint addresses.

All we need to do is write a custom ServiceHostFactory that grabs the addresses and then configures our service component with multiple endpoints. The WCF Facility already provides a custom ServiceHostFactory, the WindsorServiceHostFactory, so we can simply specialise that:

   1: using System;
   2: using System.Collections.Generic;
   3: using System.Diagnostics;
   4: using System.ServiceModel;
   5: using Castle.Facilities.WcfIntegration;
   6: using Castle.MicroKernel;
   7: using Suteki.Blog.Multitenanted.IoC;
   8:  
   9: namespace Suteki.Blog.Multitenanted.Wcf
  10: {
  11:     public class MultitenantedServiceHostFactory : WindsorServiceHostFactory<DefaultServiceModel>
  12:     {
  13:         public MultitenantedServiceHostFactory(){ }
  14:  
  15:         public MultitenantedServiceHostFactory(IKernel kernel)
  16:             : base(kernel)
  17:         { }
  18:  
  19:         public override ServiceHostBase CreateServiceHost(string constructorString, Uri[] baseAddresses)
  20:         {
  21:             AddEndpoints(constructorString, baseAddresses);
  22:  
  23:             // passing no baseAddresses forces WCF to use the endpoint address
  24:             return base.CreateServiceHost(constructorString, new Uri[0]);
  25:         }
  26:  
  27:         protected override ServiceHost CreateServiceHost(Type serviceType, Uri[] baseAddresses)
  28:         {
  29:             AddEndpoints(serviceType, baseAddresses);
  30:             return base.CreateServiceHost(serviceType, new Uri[0]);
  31:         }
  32:  
  33:         private static void AddEndpoints(Type serviceType, Uri[] baseAddresses)
  34:         {
  35:             var handler = ContainerBuilder.GlobalKernel.GetHandler(serviceType);
  36:             AddEnpoints(baseAddresses, handler);
  37:         }
  38:  
  39:         private static void AddEndpoints(string constructorString, Uri[] baseAddresses)
  40:         {
  41:             var handler = ContainerBuilder.GlobalKernel.GetHandler(constructorString);
  42:             AddEnpoints(baseAddresses, handler);
  43:         }
  44:  
  45:         private static void AddEnpoints(Uri[] baseAddresses, IHandler handler)
  46:         {
  47:             var endpoints = new List<IWcfEndpoint>();
  48:  
  49:             // create an endpoint for each base address
  50:             foreach (var uri in baseAddresses)
  51:             {
  52:                 endpoints.Add(WcfEndpoint.BoundTo(new BasicHttpBinding()).At(uri.ToString()));
  53:             }
  54:  
  55:             // add the endpoints to the service
  56:             handler.ComponentModel.CustomDependencies.Add(
  57:                 Guid.NewGuid().ToString(), 
  58:                 new DefaultServiceModel().Hosted().AddEndpoints(endpoints.ToArray()));
  59:         }
  60:     }
  61: }

All the action happens in the final AddEndpoints method. We use the WCF Facility’s fluent configuration to create an endpoint for each address that IIS gives us (effectively an address for each host header) and then add the endpoints to the Kernel’s component model for the service that is being hosted.

Note that I’m simply adding a custom dependency to the component model. The WCF Facility automatically searches the hosted component’s custom dependencies for service models. The DefaultServiceModel simply specifies the WCF BasicHttpBinding.

Note also that I have to use a service locator (ContainerBuilder.GlobalKernel) to get a reference to the Kernel because the WindsorServiceHostFactory’s kernel field is private rather than protected. It would be nice if this could be changed…. Craig?

Next we need to alter our svc file to point to our custom ServiceHostFactory:

<%@ ServiceHost Service="blogService" Factory="Suteki.Blog.Multitenanted.Wcf.MultitenantedServiceHostFactory, Suteki.Blog.Multitenanted"  %>

Now we can happily call the service from both http://red.shop/BlogService.svc and http://blue.shop/BlogService.svc.

If you simply want your service to work with multiple bindings this is all you have to do. However, as I described above, we might also want to compose our service based on the hostname.

For that we need to write an IHandlerSelector that can choose components based on the current host name. I’ve written about how to this in a web application here. Please read that first if you haven’t encountered IHandlerSelector before.  We use a similar approach, but this time we are going to use the very handy Windsor NamingPartsSubSystem to give our components a hostname parameter that we use to match on.

   1: using System;
   2: using System.Linq;
   3: using System.Diagnostics;
   4: using System.ServiceModel;
   5: using Castle.MicroKernel;
   6:  
   7: namespace Suteki.Blog.Multitenanted.IoC
   8: {
   9:     public class HostBasedComponentSelector : IHandlerSelector
  10:     {
  11:         private readonly IKernel kernel;
  12:  
  13:         public HostBasedComponentSelector(IKernel kernel)
  14:         {
  15:             this.kernel = kernel;
  16:         }
  17:  
  18:         public bool HasOpinionAbout(string key, Type service)
  19:         {
  20:             if (OperationContext.Current == null) return false;
  21:             
  22:             var componentKey = GetComponentKeyWithHostnameParameter(key, service);
  23:             return kernel.HasComponent(componentKey);
  24:         }
  25:  
  26:         private static string GetComponentKeyWithHostnameParameter(string key, Type service)
  27:         {
  28:             if (string.IsNullOrEmpty(key))
  29:             {
  30:                 key = service.Name;
  31:             }
  32:  
  33:             var hostname = OperationContext.Current.Channel.LocalAddress.Uri.Host;
  34:             return string.Format("{0}:host={1}", key, hostname);
  35:         }
  36:  
  37:         public IHandler SelectHandler(string key, Type service, IHandler[] handlers)
  38:         {
  39:             return handlers.First(h => h.ComponentModel.Name == GetComponentKeyWithHostnameParameter(key, service));
  40:         }
  41:     }
  42: }
Remember that the IHandlerSelector interface has two methods; HasOpinionAbout and SelectHandler. In HasOpinionAbout we combine the name of the service (or the service type whatever is provided) with the hostname and ask the kernel if it can provide a component. If it can, we supply that component from the SelectHandler method.
 
In our configuration we can specify any components that we want to be chosen by hostname:
 
   1: public static IWindsorContainer Build()
   2: {
   3:     var container = new WindsorContainer();
   4:     container.Kernel.AddSubSystem(SubSystemConstants.NamingKey, new NamingPartsSubSystem());
   5:  
   6:     var debug = new ServiceDebugBehavior
   7:     {
   8:         IncludeExceptionDetailInFaults = true
   9:     };
  10:  
  11:     container.AddFacility<WcfFacility>()
  12:         .Register(
  13:             Component.For<IServiceBehavior>().Instance(debug),
  14:             Component.For<ILogger>().ImplementedBy<DefaultLogger>().Named("ILogger:host=blue.shop"),
  15:             Component.For<ILogger>().ImplementedBy<AlternativeLogger>().Named("ILogger:host=red.shop"),
  16:             Component
  17:                 .For<IBlogService>()
  18:                 .ImplementedBy<DefaultBlogService>()
  19:                 .Named("blogService")
  20:                 .LifeStyle.Transient
  21:         );
  22:  
  23:     container.Kernel.AddHandlerSelector(new HostBasedComponentSelector(container.Kernel));
  24:     GlobalKernel = container.Kernel;
  25:     return container;
  26: }
Here we specify two different components for the ILogger service which our DefaultBlogService has a dependency on; DefaultLogger and AlternativeLogger. When we call the service at http://blue.shop/BlogService.svc we will get a response from the DefaultBlogService composed with the DefaultLogger, when we call http://red.shop/BlogService.svc it will be composed with AlternativeLogger.
 
Note that we add the NamingPartsSubSystem before doing any other configuration. The HostBasedComponentSelector can be added afterwards.
 
Now I can happily add new host headers and, so long as I recycle my app pool, my service will respond as expected. Nice!