Tuesday, September 24, 2013

EasyNetQ: IConsumerDispatcher

logo_design_150

EasyNetQ has always had a single dispatcher thread that runs user message handlers. This means that a slow handler on one queue can cause other handlers on other queues to wait. The intention is that one shouldn’t write long running consumers. If you are doing long running IO you should use the SubsribeAsync method and return a task that completes when the long running IO completes.

A recent change to EasyNetQ has been to make the dispatcher a separate abstraction. This means you can replace it with your own implementation if desired.

IConsumerDispatcher

Inside EasyNetQ the dispatcher receives deliveries from the RabbitMQ C# Client library and places the delivery information on an internal concurrent queue. By default, all consumers share a single internal queue. A single dispatcher thread pulls deliveries from the queue and then asks the consumer to invoke the user message handler.

The consumer dispatcher implementation is very simple, it simply maintains a queue of Action and a thread which takes those actions from the end of the queue and runs them. You could use the same pattern whenever you need to marshal an action onto a single thread. I wrote about this more general terms here.

public class ConsumerDispatcher : IConsumerDispatcher
{
    private readonly Thread dispatchThread;
    private readonly BlockingCollection<Action> queue = new BlockingCollection<Action>();
    private bool disposed;

    public ConsumerDispatcher(IEasyNetQLogger logger)
    {
        Preconditions.CheckNotNull(logger, "logger");

        dispatchThread = new Thread(_ =>
            {
                try
                {
                    while (true)
                    {
                        if (disposed) break;

                        queue.Take()();
                    }
                }
                catch (InvalidOperationException)
                {
                    // InvalidOperationException is thrown when Take is called after 
                    // queue.CompleteAdding(), this is signals that this class is being
                    // disposed, so we allow the thread to complete.
                }
                catch (Exception exception)
                {
                    logger.ErrorWrite(exception);
                }
            }) { Name = "EasyNetQ consumer dispatch thread" };
        dispatchThread.Start();
    }

    public void QueueAction(Action action)
    {
        Preconditions.CheckNotNull(action, "action");
        queue.Add(action);
    }

    public void Dispose()
    {
        queue.CompleteAdding();
        disposed = true;
    }
}

An implementation of IConsumerDispatcherFactory maintains a single instance of IConsumerDispatcher:

public class ConsumerDispatcherFactory : IConsumerDispatcherFactory
{
    private readonly Lazy<IConsumerDispatcher> dispatcher;

    public ConsumerDispatcherFactory(IEasyNetQLogger logger)
    {
        Preconditions.CheckNotNull(logger, "logger");
        
        dispatcher = new Lazy<IConsumerDispatcher>(() => new ConsumerDispatcher(logger));
    }

    public IConsumerDispatcher GetConsumerDispatcher()
    {
        return dispatcher.Value;
    }
    
    public void Dispose()
    {
        if (dispatcher.IsValueCreated)
        {
            dispatcher.Value.Dispose();
        }
    }
}

If you wanted to use an alternative dispatch strategy; say for example you (quite reasonably) wanted a new dispatch thread for each consumer, you would simply implement an alternative IConsumerDispatcherFactory and register it with EasyNetQ like this:

var bus = RabbitHutch.CreateBus("host=localhost", 
    x => x.Register<IConsumerDispatcherFactory>(_ => new MyConsumerDispatcherFactory()));

Happy messaging!

Monday, September 23, 2013

RabbitMQ: AMQP Channel Best Practices

I’ve long been confused with best practices around AMQP channel handling. This post is my attempt to explain my current thoughts, partly in an attempt to elicit feedback.

The conversation between a message broker and a client is two-way. Both the client and the server can initiate ‘communication events’; the client can invoke a method on the server: ‘publish’ or ‘declare’, for example; and the server can invoke a method on the client such as ‘deliver’ or ‘reject’. Because the client needs to receive methods from the server, it needs to keep a connection open for its lifetime. This means that broker connections may last long periods; hours, days, or weeks. Maintaining these connections is expensive, both for the client and the server. In order to have many logical connections without the overhead of many physical TCP/IP connections, AMQP has the concept of ‘channel’ (confusingly represented by the IModel interface in the Java and .NET clients). You can create multiple channels on a single connection and it’s relatively cheap to create and dispose of them.

But what are the recommended rules for handling these channels? Should I create a new one for every operation? Or should I just keep a single one around and execute every method on it?

First some hard and fast rules (note I’m using the RabbitMQ .NET client for reference here, other clients might have different behaviour):

Channels are not thread safe. You should create and use a channel on a single thread. From the .NET client documentation (section 2.10):

“In general, IModel instances should not be used by more than one thread simultaneously: application code should maintain a clear notion of thread ownership for IModel instances.”

Apparently this is not a hard and fast rule with the Java client, just good advice. The java client serializes all calls to a channel.

An ACK should be invoked on the same channel on which the delivery was received. The delivery tag is scoped to the channel and an ACK sent to a different channel from which the delivery was received will cause a channel error. This somewhat contradicts the ‘Channels are not thread safe’ directive above since you will probably ACK on a different thread from one where you invoked basic.consume, but this seems to be acceptable.

Now some softer suggestions:

It seems neater to create a channel for each consumer. I like thinking of the consumer and channel as a unit: when I create a consumer, I also create a channel for it to consume from. When the consumer goes away, so does the channel and vice-versa.

Do not mix publishing and consuming on the same channel. If you follow the suggestion above, it implies that you have dedicated channels for each consumer. It follows that you should create separate channels for server and client originated methods.

Maintain a long running publish channel. My current implementation of EasyNetQ makes creating channels for publishing the responsibility of the user. I now think this is mistake. It encourages the pattern of: create a channel, publish, dispose the channel. This pattern doesn’t work with publisher confirms where you need to keep the channel open at least until you receive an ACK or NACK. And although creating channels is relatively lightweight, there is still some overhead. I now favour the approach of maintaining a single publish channel on a dedicated thread and marshalling publish (and declare) calls to it. This is potentially a bottleneck, but the impressive performance of non-transactional publishing means that I’m not overly concerned about it.

Thursday, September 12, 2013

EasyNetQ: Topic Confusion!

This is a quick post to highlight a common cause of confusion when people play with topics in EasyNetQ.

You can subscribe to a message type with a topic like this:

bus.Subscribe<MyMessage>("id1", myHandler, x => x.WithTopic("X.*"));

Topics are dot separated strings that match with the routing key attached to a message at publication. In the code above I’ve said, give me any message of type MyMessage who’s topic matches “x.*”. The ‘*’ character is a wildcard, so “X.A” would match, as would “X.Z”, but “Y.A” wouldn’t.

You publish with a topic like this:

using (var publishChannel = bus.OpenPublishChannel())
{
    publishChannel.Publish(myMessage, x => x.WithTopic("X.A"));
}

The confusion occurs when the topic in the subscribe call changes. Maybe you are experimenting with topics by changing the string in the WithTopic( … ) method, or perhaps you are hoping to dynamically change the topic at runtime? Maybe you’ve done several subscribes, each with a different handler and a different topic, but the same subscription Id. Either way, you’ll probably be surprised to find that you still get all the messages matched by previously set topics as well as those matched by the current topic.

In order to explain why this happens, let’s look at how EasyNetQ creates exchanges, queues and bindings when you call these API methods.

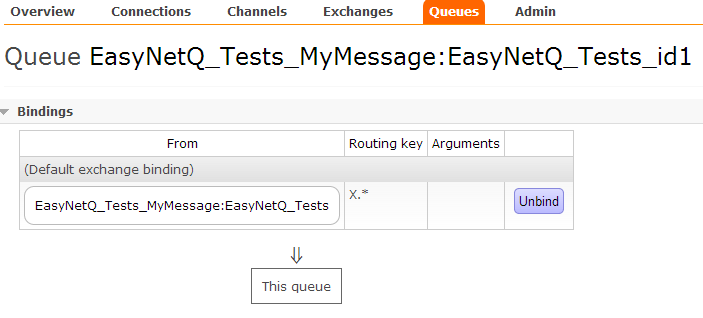
If I call the subscribe method above, EasyNetQ will declare a topic-exchange named after the type, a queue named after the type and the subscription id, and a bind them with the given topic:

queue_binding_with_topic

If I change the topic and run the code again like this:

bus.Subscribe<MyMessage>("id1", myHandler, x => x.WithTopic("Y.*"));

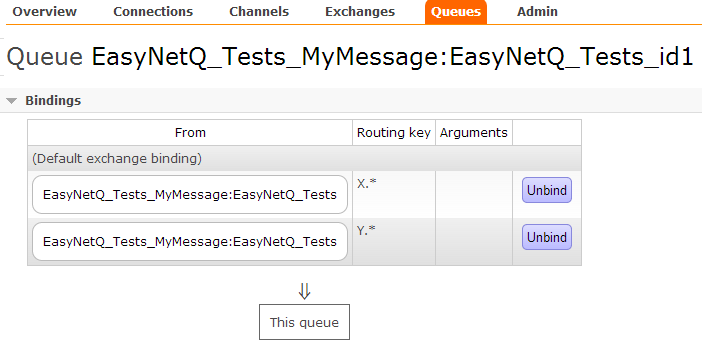
EasyNetQ will declare the same queue and exchange. The word ‘declare’ is the key here, it means, “if the object doesn’t exist, create it, otherwise do nothing.” The queue and exchange already exist, so declaring them has no effect. EasyNetQ then binds them with the given routing key. The original binding still exists – we haven’t done anything to remove it – so we now have two bindings with two different topics between the exchange and the queue:

queue_binding_with_topic2

This means that any message matching ‘X.*’ or ‘Y.*’ will be routed to the queue, and thus to our consumer.

So, beware when playing with topics!

As an aside, the ability to create multiple bindings is a very powerful feature. It allows you to implement ‘OR’ semantics for routing messages. If this is what you want, you should concatenate multiple WithTopic methods rather than make multiple calls to Subscribe. For example, say we wanted to implement ‘*.B OR Y.*’:

bus.Subscribe<MyMessage>("id4", myHandler, x => x.WithTopic("Y.*").WithTopic("*.B"));

Which would give us the desired result:

queue_binding_with_topic3

Happy routing!

Tuesday, September 10, 2013

EasyNetQ: Big Breaking Changes in the Advanced Bus

logo_design_240
EasyNetQ is my little, easy to use, client API for RabbitMQ. It’s been doing really well recently. As I write this it has 24,653 downloads on NuGet making it by far the most popular high-level RabbitMQ API.
The goal of EasyNetQ is to make working with RabbitMQ as easy as possible. I wanted junior developers to be able to use basic messaging patterns out-of-the-box with just a few lines of code and have EasyNetQ do all the heavy lifting: exchange-binding-queue configuration, error management, connection management, serialization, thread handling; all the things that make working against the low level AMQP C# API, provided by RabbitMQ, such a steep learning curve.
To meet this goal, EasyNetQ has to be a very opinionated library. It has a set way of configuring exchanges, bindings and queues based the .NET type of your messages. However, right from the first release, many users said that they liked the connection management, thread handling, and error management, but wanted to be able to set up their own broker topology. To support this we introduced the advanced API, an idea stolen shamelessly from Ayende’s RavenDb client.
You access the advanced bus (IAdvancedBus) via the Advanced property on IBus:
var advancedBus = RabbitHutch.CreateBus("host=localhost").Advanced;

Sometimes something can seem like a good idea at the time, and then later you think, “WTF! Why on earth did I do that?” It happens to me all the time. I thought it would be cool if one created the exchange-binding-queue topology and then passed it to the publish and subscribe methods, which would then internally declare the exchanges and queues and do the binding. I implemented a tasty little visitor pattern in my ITopologyVisitor. I optimised for (my) programming fun rather than an a simple, obvious, easy to understand API.
I realised a while ago that a more straightforward set of declares on IAdvancedBus would be a far more obvious and intentional design. To this end, I’ve refactored the advanced bus to separate declares from publishing and consuming. I just pushed the changes to NuGet and have also updated the Advanced Bus documentation. Note these are breaking changes, so please be careful if you are upgrading to the latest version, 0.12, and upwards.
Here are some tasters of how it works:
Declare a queue, exchange and binding, and consume raw message bytes:
var advancedBus = RabbitHutch.CreateBus("host=localhost").Advanced;

var queue = advancedBus.QueueDeclare("my_queue");
var exchange = advancedBus.ExchangeDeclare("my_exchange", ExchangeType.Direct);
advancedBus.Bind(exchange, queue, "routing_key");

advancedBus.Consume(queue, (body, properties, info) => Task.Factory.StartNew(() =>
    {
        var message = Encoding.UTF8.GetString(body);
        Console.Out.WriteLine("Got message: '{0}'", message);
    }));

Note I’ve renamed ‘Subscribe’ to ‘Consume’ to better reflect the underlying AMQP method.
Declare an exchange and publish a message:
var advancedBus = RabbitHutch.CreateBus("host=localhost").Advanced;

var exchange = advancedBus.ExchangeDeclare("my_exchange", ExchangeType.Direct);

using (var channel = advancedBus.OpenPublishChannel())
{
    var body = Encoding.UTF8.GetBytes("Hello World!");
    channel.Publish(exchange, "routing_key", new MessageProperties(), body);
}

You can also delete exchanges, queues and bindings:
var advancedBus = RabbitHutch.CreateBus("host=localhost").Advanced;

// declare some objects
var queue = advancedBus.QueueDeclare("my_queue");
var exchange = advancedBus.ExchangeDeclare("my_exchange", ExchangeType.Direct);
var binding = advancedBus.Bind(exchange, queue, "routing_key");

// and then delete them
advancedBus.BindingDelete(binding);
advancedBus.ExchangeDelete(exchange);
advancedBus.QueueDelete(queue);

advancedBus.Dispose();

I think these changes make for a much better advanced API. Have a look at the documentation for the details.

Tuesday, July 09, 2013

Brighton ALT NET @ Brighton Digital Festival


BDF_logo_date_flame_cmyk


TL;DR We need you! Present your project at our BDF special event in September.

Brighton Digital Festival is a month long celebration of all things digital throughout September in the lovely city of Brighton. There’s absolutely loads going on, and one would need to take the whole month off work to see everything. Last year was a blast, and this year looks to be even better, with full time festival organisers and funding from the arts council.

Brighton ALT NET is a monthly meet-up for .NET developers. We’ve been going for several years now. Each month we meet up, drink beer, and geek out about the .NET framework and software development in general. For our September event we thought it would be excellent fun to join in with the Digital Festival and do something special. We want to showcase some of the brilliant things developers like you are doing in the local area; a show-and-tell of awesome if you will. If you’ve got a project you’d like to show off, something you’ve done at work, or in your spare time, get in touch with me. It can be anything from a Netduino mouse-trap to online community of traffic cone spotters.

Email me at mike-at-suteki.co.uk.

Tuesday, June 18, 2013

Guest Post: Working Around F#/NuGet Problems

A first for me. A guest post by my excellent colleague Michael Newton.

Michael normally blogs at http://blog.mavnn.co.uk and works at 15below. He’s the build manager at 15below and has developed various work arounds for the F# NuGet issues we’ve been experiencing. I’ll hand over and let him explain …

In his first post Mike did an excellent job explaining the bugs we found when trying to add or update NuGet references in fsproj files.

Unfortunately, the confusion doesn’t stop there. It turns out that if you examine the NuGet code, the logic for updating project files is not in NuGet.Core (the shared dll that drives core functionality like how to unpack a nupkg file) but is re-implemented in each client. This means that you get different results if you are running commands from the command line client than if you are using the Visual Studio plugin or the hosted PowerShell console. The reason for this starts to become obvious once you realise that the command line client has no parameters for specifying which project and/or solution you are working against, whilst that information is either already available in the Visual Studio plugin or required via little dropdown boxes in the hosted PowerShell console.

So, between everyday usage, preparing to move some of our project references to NuGet and the needs of our continuous integration we now had the following requirements:

  1. Reliable installation of NuGet references to C#, VB.net and F# projects. Preferably with an option of doing it via the command line to help scripting the project reference to NuGet reference moves.
  2. Reliable upgrades of NuGet references in all project types. Again, a command line option would be useful.
  3. Reliable downgrades of NuGet references in all project types. It’s painful to try a new release/pre-release of a NuGet package across a solution and then discover that you have to manually downgrade all of the projects separately if you decide not to take the new version.
  4. Reliable removal of NuGet references turns out to be a requirement of reliable downgrades.
  5. Sane solution wide management of references. Due to the way project references work, we need an easy way to ensure that all of the projects in a solution use the same version of any particular NuGet reference, and to check that this will not case any version conflicts. So ideally, upgrade and downgrade commands will run against a solution.

Looking at our requirements in terms of what is already handled by NuGet and what is affected by the bugs that Mike discussed last time, we get:

  1. Very buggy for F# projects, fix relies on a fix to the underlying F# project type which is probably unlikely before Visual Studio version next. Also, command line installing that adds project references is not supported in nuget.exe by design.
  2. Again, broken for F# projects. Otherwise works.
  3. Not supported by design in any of the NuGet clients.
  4. Appears to work.
  5. Not supported by NuGet.

As we looked at the list, it became apparent that we were unlikely to see the F# bug fixed any time soon, and even if we did there would still be several areas of functionality that we would be missing but would help us greatly. The number of options that we needed that the mainline NuGet project does not support by design swung the balance for us from a work-around or bug patch in NuGet’s Visual Studio project handling to a full blown wrapper library.

So, the NuGetPlus project was born. As always, the name is a misnomer. Because naming things is hard. But the idea is to build a NuGet wrapper that provides the functionality above, and as a bonus extra for both us and the F# community, does not exhibit the annoying F# bugs from the previous post. Because the command line exe in NuGetPlus is only a very thin wrapper around the dll, it also allows you to easily call into the process from code and achieve results the same as running the command line program without having to write 100s of lines of supporting boiler plate. For those of you who have tried to use NuGet.Core directly, you’ll know that it’s a bit of an exercise in frustration actually mimicking the full behaviour of any of the clients.

It is very much still a work in progress. For example, it respects nuget.config files, but at the moment only makes use of the repository path and source list config options – we haven’t checked if we need to be supporting more. But it covers scenarios 1-4 above nicely, and we’re hoping to add 5 (solution level upgrade, downgrade and checking) fairly shortly. Although it has been developed on work time as functionality we desperately need in house, it is also a fully open source MIT licensed project that we are more than happy to receive pull requests for if there is functionality the community needs.

So whether you’re a F# NuGet user, or you just see the value of the additional functionality above, take it for a spin and let us know what you think.

Redis: Very Useful As a Distributed Lock

In a Service Oriented Architecture you sometimes need a distributed lock; an application lock across many servers to serialize access to some constrained resource. I’ve been looking at using Redis, via the excellent ServiceStack.Redis client library, for this.

It really is super simple. Here’s a little F# sample to show it in action:

   1: module Zorrillo.Runtime.ProxyAutomation.Tests.RedisSpike
   2:  
   3: open System
   4: open ServiceStack.Redis
   5:  
   6: let iTakeALock n = 
   7:     async {
   8:         use redis = new RedisClient("redis.local")
   9:         let lock = redis.AcquireLock("integration_test_lock", TimeSpan.FromSeconds(10.0))
  10:         printfn "Aquired lock for %i" n 
  11:         Threading.Thread.Sleep(100)
  12:         printfn "Disposing of lock for %i" n
  13:         lock.Dispose()
  14:     }
  15:  
  16: let ``should be able to save and retrieve from redis`` () =
  17:     
  18:     [for i in [0..9] -> iTakeALock i]
  19:         |> Async.Parallel
  20:         |> Async.RunSynchronously

The iTakeALock function creates an async task that uses the SeviceStack.Redis AquireLock function. It then pretends to do some work (Thread.Sleep(100)), and then releases the lock (lock.Dispose()).

Running 10 iTakeALocks in parallel (line 16 onwards) gives the following result:

Aquired lock for 2
Disposing of lock for 2
Aquired lock for 6
Disposing of lock for 6
Aquired lock for 0
Disposing of lock for 0
Aquired lock for 7
Disposing of lock for 7
Aquired lock for 9
Disposing of lock for 9
Aquired lock for 5
Disposing of lock for 5
Aquired lock for 3
Disposing of lock for 3
Aquired lock for 8
Disposing of lock for 8
Aquired lock for 1
Disposing of lock for 1
Aquired lock for 4
Disposing of lock for 4

Beautifully serialized access from parallel processes. Very nice.

Monday, June 17, 2013

Automating Nginx Reverse Proxy Configuration

proxyautomation

It’s really nice if you can decouple your external API from the details of application segregation and deployment.

In a previous post I explained some of the benefits of using a reverse proxy. On my current project we’ve building a distributed service oriented architecture that also exposes an HTTP API, and we’re using a reverse proxy to route requests addressed to our API to individual components. We have chosen the excellent Nginx web server to serve as our reverse proxy; it’s fast, reliable and easy to configure. We use it to aggregate multiple services exposing HTTP APIs into a single URL space. So, for example, when you type:

http://api.example.com/product/pinstripe_suit

It gets routed to:

http://10.0.1.101:8001/product/pinstripe_suit

But when you go to:

http://api.example.com/customer/103474783

It gets routed to

http://10.0.1.104:8003/customer/103474783

To the consumer of the API it appears that they are exploring a single URL space (http://api.example.com/blah/blah), but behind the scenes the different top level segments of the URL route to different back end servers. /product/… routes to 10.0.1.101:8001, but /customer/… routes to 10.0.1.104:8003.

We also want this to be self-configuring. So, say I want to create a new component of the system that records stock levels. Rather than extending an existing component, I want to be able to write a stand-alone executable or service that exposes an HTTP endpoint, have it be automatically deployed to one of the hosts in my cloud infrastructure, and have Nginx automatically route requests addressed http://api.example.com/stock/whatever to my new component.

We also want to load balance these back end services. We might want to deploy several instances of our new stock API and have Nginx automatically round robin between them.

We call each top level segment ( /stock, /product, /customer ) a claim. A component publishes an ‘AddApiClaim’ message over RabbitMQ when it comes on line. This message has 3 fields: ‘Claim', ‘ipAddress’, and ‘PortNumber’. We have a special component, ProxyAutomation, that subscribes to these messages and rewrites the Nginx configuration as required. It uses SSH and SCP to log into the Nginx server, transfer the various configuration files, and instruct Nginx to reload its configuration. We use the excellent SSH.NET library to automate this.

A really nice thing about Nginx configuration is wildcard includes. Take a look at our top level configuration file:

   1: ...
   2:  
   3: http {
   4:     include       /etc/nginx/mime.types;
   5:     default_type  application/octet-stream;
   6:  
   7:     log_format  main  '$remote_addr - $remote_user [$time_local] "$request" '
   8:                       '$status $body_bytes_sent "$http_referer" '
   9:                       '"$http_user_agent" "$http_x_forwarded_for"';
  10:  
  11:     access_log  /var/log/nginx/access.log  main;
  12:  
  13:     sendfile        on;
  14:     keepalive_timeout  65;
  15:  
  16:     include /etc/nginx/conf.d/*.conf;
  17: }

Line 16 says, take any *.conf file in the conf.d directory and add it here.

Inside conf.d is a single file for all api.example.com requests:

   1: include     /etc/nginx/conf.d/api.example.com.conf.d/upstream.*.conf;
   2:  
   3: server {
   4:     listen          80;
   5:     server_name     api.example.com;
   6:  
   7:     include         /etc/nginx/conf.d/api.example.com.conf.d/location.*.conf;
   8:  
   9:     location / {
  10:         root    /usr/share/nginx/api.example.com;
  11:         index   index.html index.htm;
  12:     }
  13: }

This is basically saying listen on port 80 for any requests with a host header ‘api.example.com’.

This has two includes. The first one at line 1, I’ll talk about later. At line 7 it says ‘take any file named location.*.conf in the subdirectory ‘api.example.com.conf.d’ and add it to the configuration. Our proxy automation component adds new components (AKA API claims) by dropping new location.*.conf files in this directory. For example, for our stock component it might create a file, ‘location.stock.conf’, like this:

   1: location /stock/ {
   2:     proxy_pass http://stock;
   3: }

This simply tells Nginx to proxy all requests addressed to api.example.com/stock/… to the upstream servers defined at ‘stock’. This is where the other include mentioned above comes in, ‘upstream.*.conf’. The proxy automation component also drops in a file named upstream.stock.conf that looks something like this:

   1: upstream stock {
   2:     server 10.0.0.23:8001;
   3:     server 10.0.0.23:8002;
   4: }

This tells Nginx to round-robin all requests to api.example.com/stock/ to the given sockets. In this example it’s two components on the same machine (10.0.0.23), one on port 8001 and the other on port 8002.

As instances of the stock component get deployed, new entries are added to upstream.stock.conf. Similarly, when components get uninstalled, the entry is removed. When the last entry is removed, the whole file is also deleted.

This infrastructure allows us to decouple infrastructure configuration from component deployment. We can scale the application up and down by simply adding new component instances as required. As a component developer, I don’t need to do any proxy configuration, just make sure my component publishes add and remove API claim messages and I’m good to go.

Thursday, June 13, 2013

NuGet Install Is Broken With F#

There’s a very nasty bug when you try and use NuGet to add a package reference to an F# project. It manifests itself when either the assembly that is being installed also has a version in the GAC or a different version already exists in the output directory.

First let’s reproduce the problem when a version of the assembly already exists in the GAC.

Create a new solution with an F# project.

Choose an assembly that you want to install from NuGet that also exists in the GAC on your machine. For ironic purposes I’m going to choose NuGet.Core for this example.

It’s in my GAC:

D:\>gacutil -l | find "NuGet.Core"
NuGet.Core, Version=1.0.11220.104, Culture=neutral, PublicKeyToken=31bf3856ad364e35, processorArchitecture=MSIL
NuGet.Core, Version=1.6.30117.9648, Culture=neutral, PublicKeyToken=31bf3856ad364e35, processorArchitecture=MSIL

You can see that the highest version in the GAC is version 1.6.30117.9648

Now let’s install NuGet.Core version 2.5.0 from the official NuGet source:

PM> Install-Package NuGet.Core -Version 2.5.0
Installing 'Nuget.Core 2.5.0'.
Successfully installed 'Nuget.Core 2.5.0'.
Adding 'Nuget.Core 2.5.0' to Mike.NuGetExperiments.FsProject.
Successfully added 'Nuget.Core 2.5.0' to Mike.NuGetExperiments.FsProject.

It correctly creates a packages directory, downloads the NuGet.Core package and creates a packages.config file:

D:\Source\Mike.NuGetExperiments\src>tree /F
D:.
│ Mike.NuGetExperiments.sln

├───Mike.NuGetExperiments.FsProject
│ │ Mike.NuGetExperiments.FsProject.fsproj
│ │ packages.config
│ │ Spike.fs
│ │
│ ├───bin
│ │ └───Debug
│ │
│ └───obj
│ └───Debug

└───packages
│ repositories.config

└───Nuget.Core.2.5.0
│ Nuget.Core.2.5.0.nupkg
│ Nuget.Core.2.5.0.nuspec

└───lib
└───net40-Client
NuGet.Core.dll

But when when I look at my fsproj file I see that it has incorrectly referenced the NuGet.Core version (1.6.30117.9648) from the GAC and there is no hint path pointing to the downloaded package.

<Reference Include="NuGet.Core, Version=1.6.30117.9648, Culture=neutral, PublicKeyToken=31bf3856ad364e35">
<Private>True</Private>
</Reference>

Next let’s reproduce the problem when a version of an assembly already exists in the output directory.

This time I’m going to EasyNetQ as my example DLL. First I’m going to take a recent version of EasyNetQ.dll, 0.10.1.92 and drop it into to the projects output directory (bin\Debug).

Next use NuGet to install an earlier version of the assembly:

Install-Package EasyNetQ -Version 0.9.2.76
Attempting to resolve dependency 'RabbitMQ.Client (= 3.0.2.0)'.
Attempting to resolve dependency 'Newtonsoft.Json (≥ 4.5)'.
Installing 'RabbitMQ.Client 3.0.2'.
Successfully installed 'RabbitMQ.Client 3.0.2'.
Installing 'Newtonsoft.Json 4.5.11'.
Successfully installed 'Newtonsoft.Json 4.5.11'.
Installing 'EasyNetQ 0.9.2.76'.
Successfully installed 'EasyNetQ 0.9.2.76'.
Adding 'RabbitMQ.Client 3.0.2' to Mike.NuGetExperiments.FsProject.
Successfully added 'RabbitMQ.Client 3.0.2' to Mike.NuGetExperiments.FsProject.
Adding 'Newtonsoft.Json 4.5.11' to Mike.NuGetExperiments.FsProject.
Successfully added 'Newtonsoft.Json 4.5.11' to Mike.NuGetExperiments.FsProject.
Adding 'EasyNetQ 0.9.2.76' to Mike.NuGetExperiments.FsProject.
Successfully added 'EasyNetQ 0.9.2.76' to Mike.NuGetExperiments.FsProject.

NuGet reports that everything went according to plan and that EasyNetQ 0.9.2.76 has been successfully added to my project.

Once again the packages directory was successfully created and the correct version of EasyNetQ has been downloaded. The packages.config file also has the correct version of EasyNetQ. I won’t show you the output from ‘tree’ again, it’s much the same as before.

Again, when I look at my fsproj file the version of EasyNetQ is incorrect, it’s 0.10.1.92, and again there’s no hint path:

<Reference Include="EasyNetQ, Version=0.10.1.92, Culture=neutral, PublicKeyToken=null">
<Private>True</Private>
</Reference>

Yup, NuGet install is most definitely broken with F#.

This bug makes using NuGet and F# together an exercise in frustration. Our team has wasted days attempting to get to the bottom of this.

It seems that it’s a well know problem. Just take a look at this workitem, reported over a year ago:

http://nuget.codeplex.com/workitem/2149

After much cursing of NuGet, the problem actually appears to be with the F# project system rather than with NuGet itself:

“F# knows about this behavior and they will release the fix”

Hmm, it hasn’t been fixed yet.

We had a dig around the NuGet code. The interesting piece is this file snippet (from NuGet.VisualStudio.VsProjectSystem):

   1: public virtual void AddReference(string referencePath, Stream stream)
   2: {
   3:     string name = Path.GetFileNameWithoutExtension(referencePath);
   4:     try
   5:     {
   6:         // Get the full path to the reference
   7:         string fullPath = PathUtility.GetAbsolutePath(Root, referencePath);
   8:         string assemblyPath = fullPath;
   9:  
  10:         ...
  11:  
  12:         // Add a reference to the project
  13:         dynamic reference = Project.Object.References.Add(assemblyPath);
  14:  
  15:         ...
  16:  
  17:         TrySetCopyLocal(reference);
  18:  
  19:         // This happens if the assembly appears in any of the search
  20:         // paths that VS uses to locate assembly references. Most commonly, 
  21:         // it happens if this assembly is in the GAC or in the output path.
  22:         if (!reference.Path.Equals(fullPath, StringComparison.OrdinalIgnoreCase))
  23:         {
  24:             // Get the msbuild project for this project
  25:             MsBuildProject buildProject = Project.AsMSBuildProject();
  26:  
  27:             if (buildProject != null)
  28:             {
  29:                 // Get the assembly name of the reference we are trying to add
  30:                 AssemblyName assemblyName = AssemblyName.GetAssemblyName(fullPath);
  31:  
  32:                 // Try to find the item for the assembly name
  33:                 MsBuildProjectItem item = 
  34:                     (from assemblyReferenceNode in buildProject.GetAssemblyReferences()
  35:                     where AssemblyNamesMatch(assemblyName, assemblyReferenceNode.Item2)
  36:                     select assemblyReferenceNode.Item1).FirstOrDefault();
  37:  
  38:                 if (item != null)
  39:                 {
  40:                     // Add the <HintPath> metadata item as a relative path
  41:                     item.SetMetadataValue("HintPath", referencePath);
  42:  
  43:                     // Save the project after we've modified it.
  44:                     Project.Save();
  45:                 }
  46:             }
  47:         }
  48:     }
  49:     catch (Exception e)
  50:     {
  51:         ...
  52:     }
  53: }

On line 13 NuGet calls out to the F# project system and asks it to add a reference to the assembly at the given path. We assume that the F# project system then does the wrong thing by searching for the assembly name anywhere in the GAC or the output directory rather than referencing the explicit assembly NuGet is asking it to reference.

Interestingly, it looks as if the NuGet team have attempted to code a work-around for this bug from line 22 onwards. Could this be why C# projects don’t exhibit this behaviour? Unfortunately the work around doesn’t work in the F# case. We think it’s because F# doesn’t respect assembly versions and will happily replace any requested assembly with another one so long as it’s got the same simple name. At line 33, no assemblies are found in the fsproj file because the ‘AssemblyNamesMatch’ function does an exact match using all four elements of the full assembly name (simple name, version, culture, and key) and of course the assembly that the F# project system has found and added has a different version.

So, come on F# team, pull your finger out and fix the Visual Studio F# project system. In the meantime, in my next post I’ll talk about some of things our team, and especially the excellent Michael Newton (@mavnn) has been doing to try and work around these problems.

Update: Micheal Newton has written a guest post to explain some of things we are doing to work around these problems.